
Frank Burns, our long term SCX10 project (see the build thread here: https://1i-rc.com/project-log-axial-scx10-dingo-2010/ ) and our Redcat GEN8 SR5 tribute to my Dad (see it here: https://1i-rc.com/review-redcat-gen8-pack/ ) both fall squarely into SORRCA’s Class 1 category with their smaller tires and plethora of scale details but I want something more capable; something that can clean any line on any course or trail without breaking a sweat. I want a Class 2 rig. However I don’t want to mortgage my house to build one. This raises an interesting question: can you build a competitive Class 2 rig on a budget? Follow along as we find out!
THE CHASSIS
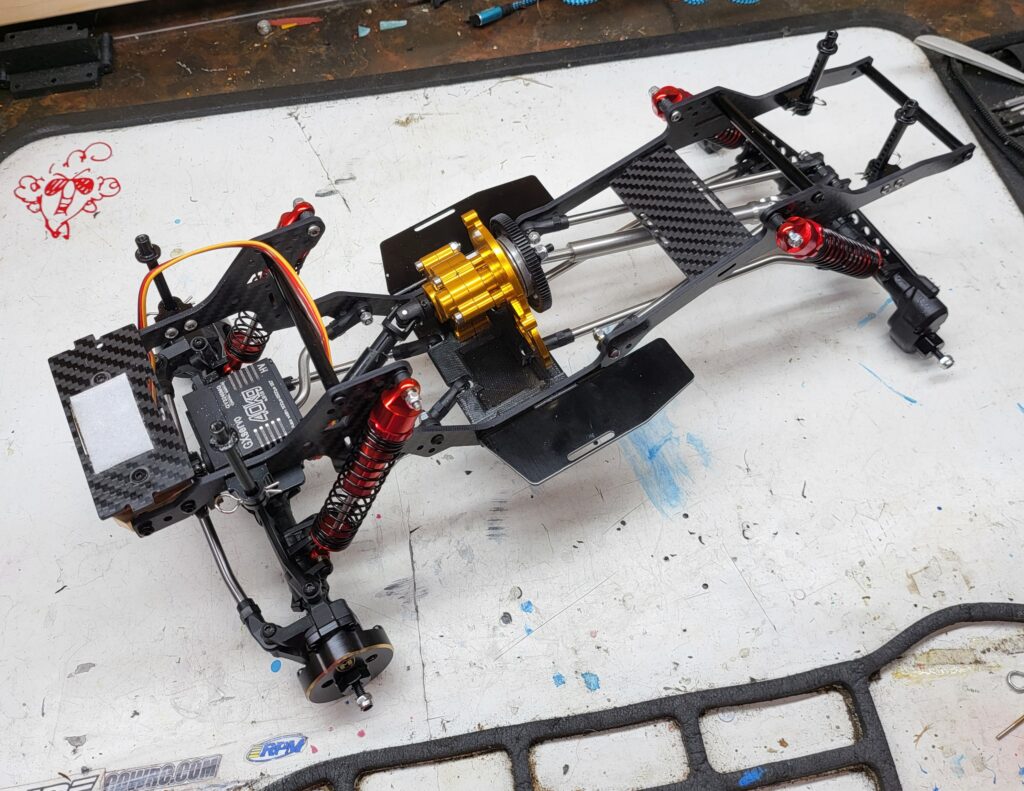
To be truly competitive and to have the most capable rig possible within the rule set we’ll begin by choosing a LCG (low center of gravity) chassis kit to underpin the new rig. Prices on these chassis vary widely with Chinese knockoffs and clones starting at around $50 and boutique manufacturers selling high-end, one-off exotic chassis’ that can cost over $1000. While clicking around the interwebs I stumbled across a chassis on Amazon that not only tickled my carbon fiber fancy but also included a full set of high clearance links, sliders, battery and electronics mounts and even aluminum cross braces in two different lengths. This Powerhobby LCG chassis moves the center skid (and transmission) forward significantly to place more weight over the front axle for steep climbs while also lowering individual components to keep the CG as low as possible. Multiple link and shock mounting options are available front and rear and the chassis comes with the links needed to build a 4-link front and rear suspension or a 3-link front (the panhard bar is usually sold with the front axle). This opens up options for which type of steering arrangement can be used, however the chassis mounted servo mount is not included, nor is a chassis panhard mound. I chose to keep things simple and utilize an axle mounted servo and running a 4-link front and rear. The front upper 4-link bars are bent in a “z” shape to clear the motor and front driveshaft while maintaining proper front end alignment.
SUSPENSION AND FRONT AXLE
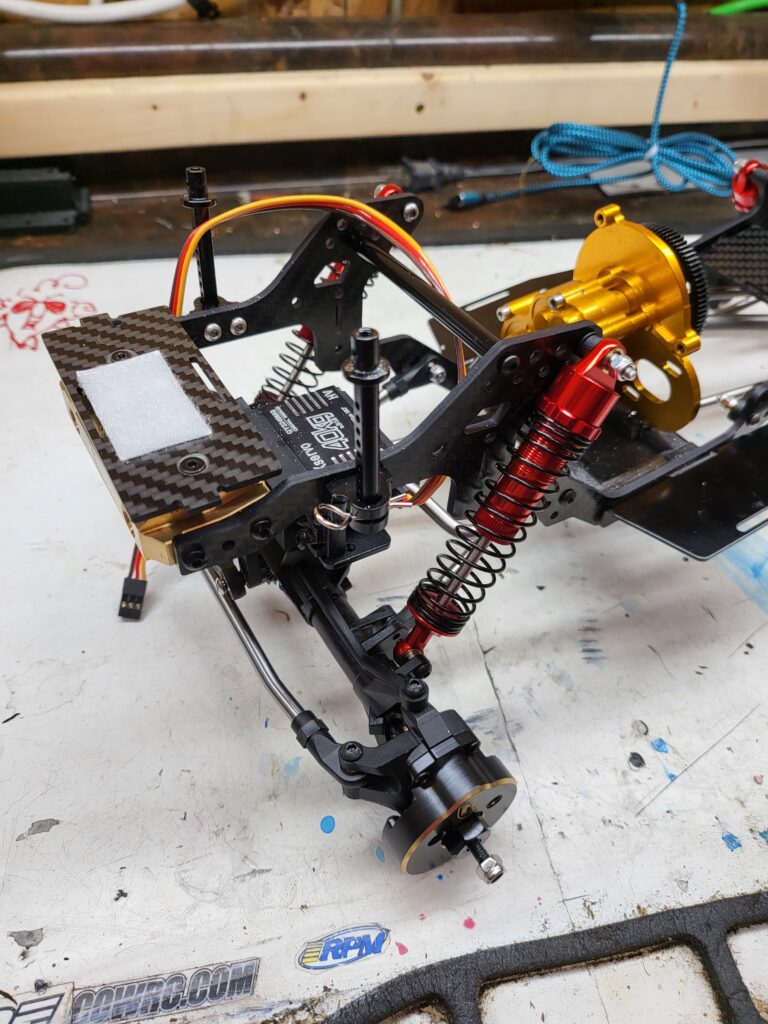
This chassis lays the shocks back significantly from stock (this is an upgrade for an Axial SCX10/ii), lowering the ride height and thus lowering the CG. These aluminum dampers are just place holders used for mockup and are a fair bit too long (they are 105mm long while the actual dampers will be 90mm units) but they do illustrate just how laid down this chassis can place the shocks. There are numerous mounting options for the body mounts and chassis cross braces while the battery and electronics trays each have one slotted home apiece. I chose to mount my battery plate over the front bumper mount by drilling and countersinking two holes that match up with the bumper mount pin hole locations to move the battery as far forward as possible. Granted, this truck will run on 3s 850mAh packs so there’s not much mass that needs moved around but every little bit helps. Speaking of the bumper mount, it is a brass piece that I found online for super cheap, and while it is placed a bit high it is weight as far forward as possible. At some point I may mount a bumper to the truck (if I want it to be Class 3 legal) but as of now it will be bumperless, front and rear. I have a set of Injora 90mm scale shocks on order that should be here by the next update. Visible in these photos are the Meus Nylon portal axles; a low-cost option for a quality axle with over 45 degrees of steering and stout portals that are designed to replace the AR44 and AR45P axles directly. These axles are sold in pairs and include steering links for both 3-and-4 link front end setups. I can’t say enough good things about these axles; they arrive properly assembled with grease already applied, the universals in the front axle do not bind even at full steering lock, there are upgrade parts and service parts available (for a low cost as well) and can even be set up with over/underdrive (more on this later). For $80, these axles are a great value; time will tell if they perform as well as expected.
SKID AND DRIVETRAIN
A PETG 3d printed center skidplate is the home for an aluminum cased, steel gear, three gear transmission as well as the lower links. I didn’t have anything longer than a 35mm stainless steel button head screw so I chose to mount the links and skid first and then mounted the sliders separately outside of those screws, capturing them for a secure fit. The aluminum sliders are bent 90 degrees and fit very nicely and even include battery strap slots if you chose to mount the pack on the slider instead of within the chassis. In the future a dig transmission may find its way into this rig for even more maneuverability than it currently has (coupled with over/underdrive this should make for an extremely tight turning radius). While this isn’t legal for Class 2 competition it can be locked out for comp use and re-engaged for fun running fairly easily. Currently connecting the transmission to the axles are a mismatched set of mockup driveshafts that will be replaced with cut-to-length shafts from Amazon once the final wheelbase is chosen.
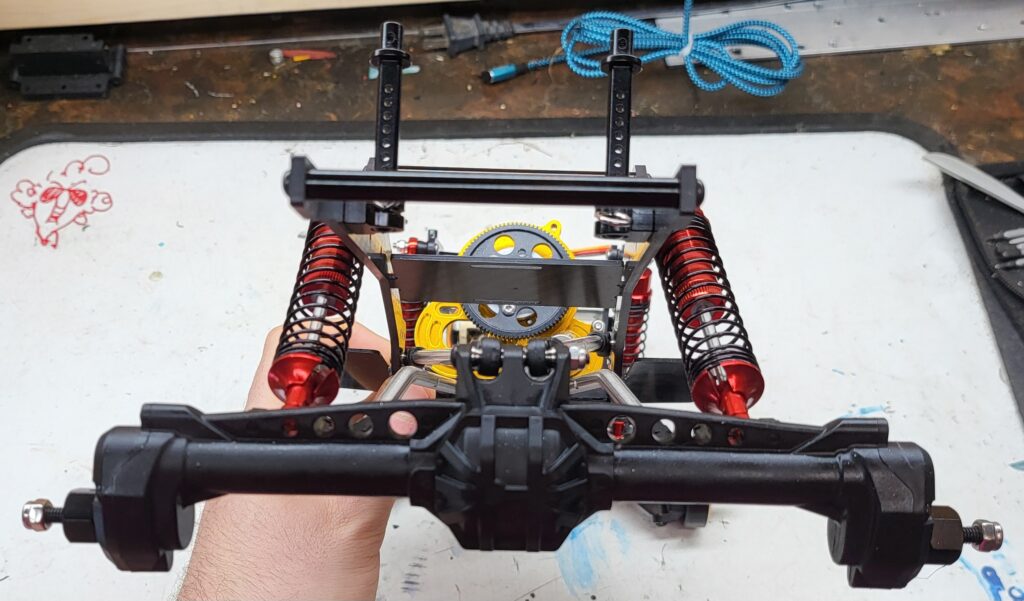
REAR AXLE
The rear axle is a one piece unit that features a full-width truss for added strength. This axle remains all nylon unlike the front which is fitted with Meus’ own brass knuckle weights. These outer portal covers weigh in at 77g each, placing that added mass as low as possible without adding rotating mass. The black and gold finish is stunning in person; these photos do not do the parts justice.
REAR LINKS AND DRIVESHAFTS
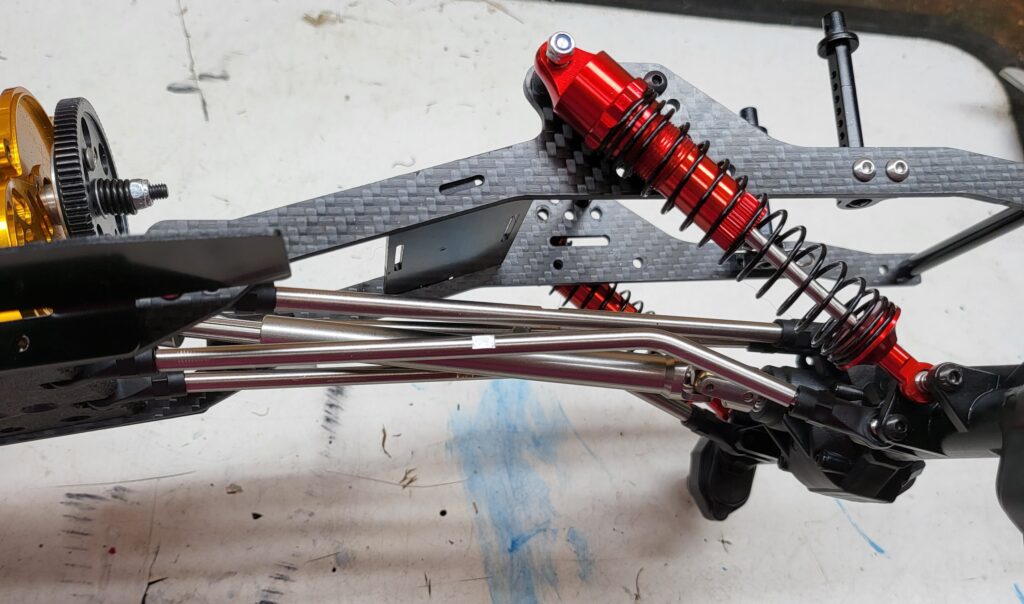
This shot shows just how long the rear of this truck is. The bent links are a big plus and allow the truck a few more degrees of breakover angle yet don’t leave the rear driveshaft exposed; this is how it should be. I’ve seen a few kits that have more severely bent links but leave the driveshaft hanging below the links as the next hangup point, defeating the purpose of the bent links in the first place. Also seen in this shot are the multiple upper link mounting holes, allowing for anti-squat changes to be made with the removal and reinstallation of two screws and nuts.
In the next update we will be choosing wheels and tires as well as a power system. A cheap Amazon 40kg servo is already installed on the front axle and will be powered by a Castle Creations 10a BEC to feed a full 8.4v to the servo without frying the receiver. Lastly, we need to pick a body for the truck; I’ve got my eye on a few shells but would love to hear your suggestions for a body you’d like to see featured on this budget gate crasher. Until next time, be kind to each other, be king to yourself, be kind to your RC.