
Everyone else on the net is building their
Slash 2wd as a gasser, muscle car, or top speed truck but I wanted to
be different. I was of driving age when import drag racing was in its
heyday and that has always stuck with me. I don’t really have the funds
to build a purpose built FWD 1/4 mile missile so I did the next best
thing and designed a 1/10 version that would utilize Slash parts (as I
have a pile of them laying around).
The build list so far includes:
-Brand new Traxxas Bandit XL-5 RTR (for the center chassis and transmission and suspension bits)
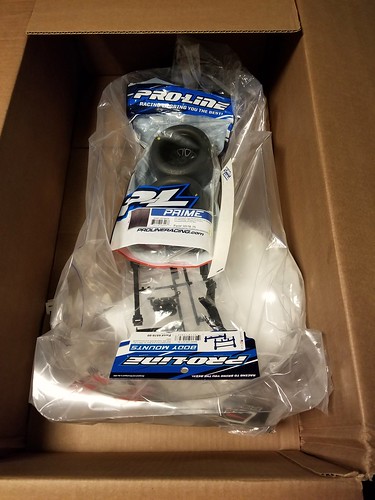
-Pro-line Prime 2.8″ tires for the FRONT
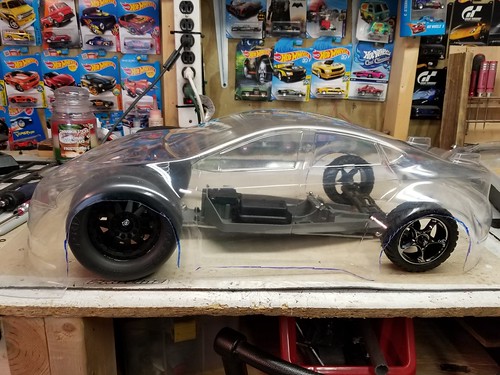
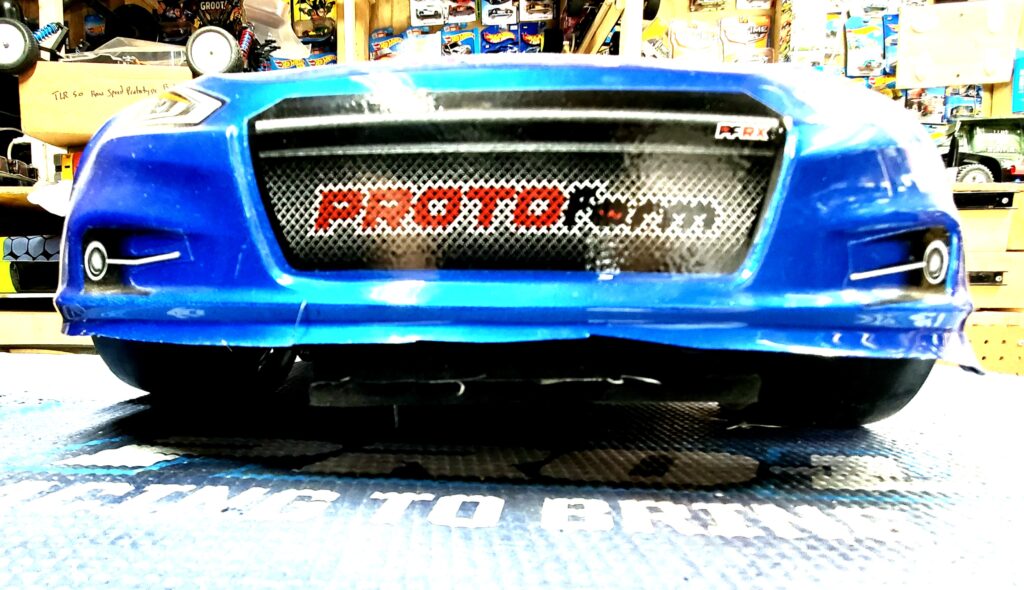
-Protoform PFRX body
-Pro-line Extended body mounts
What is coming soon:
-3800 KV 3660 4-pole motor
-1/10 buggy front tires and wheels for the REAR
-32p gearing
-TC shocks for the rear
-Aluminum chassis extension for the Bandit chassis to stretch it to the Slash’s wheelbase and also mount the steering bellcranks
-New RX
What I still need:
-Driveshafts
-ESC
-Shock tower for the rear
-Front bumper to support the nose of the body in case of an impact
I have a few ideas that are still stumping me. I want to add an
“e-brake” to lock the rear tires for a burnout but I can’t figure out a
simple way to do it. I had thought about mounting a 1/8 nitro buggy
center diff with brakes in the rear and running driveshafts down to the
rear wheels and control it through the third channel on the radio. I
would prefer not to do something this heavy back there as it serves
little purpose other than looking cool. I have also thought about using a
rocker arm and linkage to push a rod through both rear wheels to lock
them but this could be an overly complex way of accomplishing a simple
task. Thoughts?
In the end, I figure the 3800kv motor on 3s will be more than enough
power for a car this light. I had toyed around with the idea of a 2650
on 4s but that would only yield a max RPM of 44,520 while the 3800 on 3s
will give 47,880. The 3800 will also have significantly less torque
which in a FWD platform will be helpful.
Any thoughts or suggestions are welcome; I have an idea in my head of
how I want the car to be but that doesn’t mean that there aren’t better
ways of doing it that I can’t see!
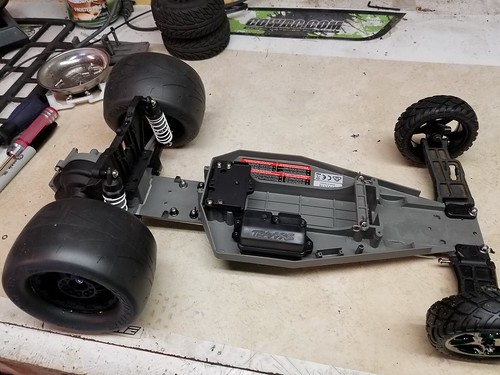
Here’s a teaser of what’s in the box so far:
Got some more parts in the mail:
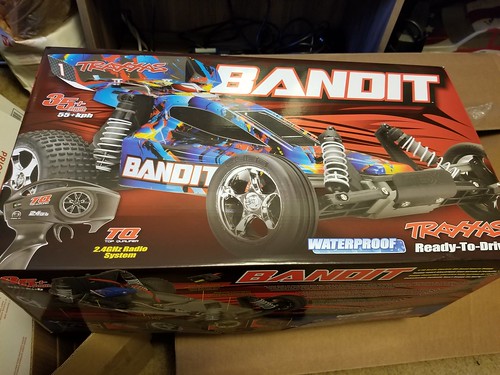
I will be using the chassis, suspension arms, transmission and steering bellcranks from this brand new Bandit XL-5.
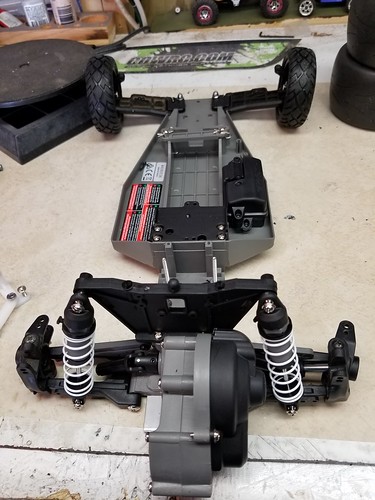
Here is an in progress pic of the “prototype” that I have been using to set the wheelbase and finalize the layout.
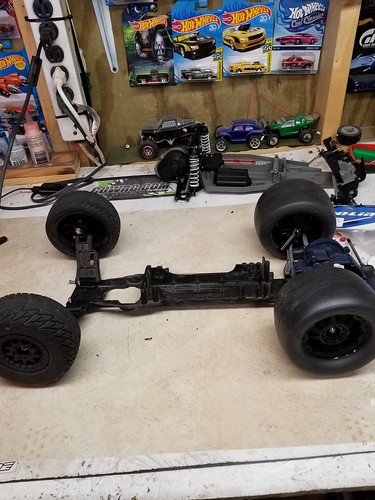
And finally, what is being used from the Bandit. I am still on the fence
about using the rear shock tower and the front shocks that are
currently mounted to it; I may use a shorter shock tower and touring car
shock as I only need enough travel to deal with gravel or expansion
joints.
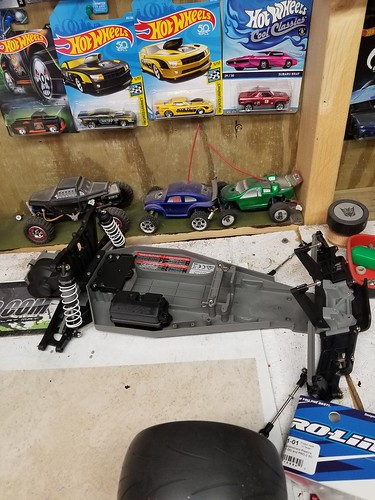
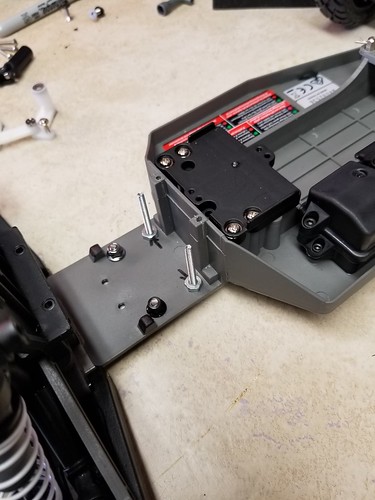
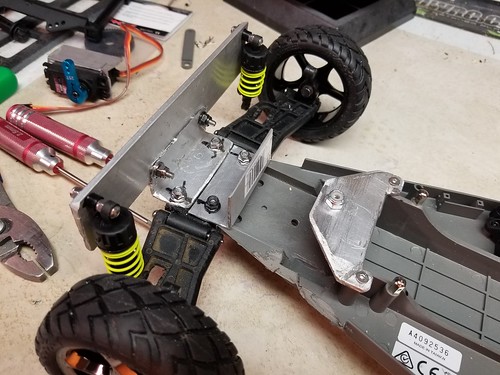
A little more progress:
I got the lower extension plate made and attached, the steering mocked
into place, the front Chubs and knuckles swapped out, the rear
suspension mounted, the 2.2″ buggy wheels and tires installed, and the
wheelbase set. The front Chubs had to be swapped out to Slash 4×4 units
to clear the driveshafts (which I am still working on procuring) as the
stock casters won’t allow for clearance for the driveshafts when
turning. I also assembled the extended body posts and picked up some
material to make the servo bracket. I still need to pick up some 6-32
all-thread for the links, an ESC and the aforementioned driveshafts. The
motor is on its way, as are the Telluride arms that will accept the new
Chubs and keep the width in check. The next bit of fab work is to make
the upper extension plate and a rear shock tower for the short TC
shocks.
Here’s a mockup with the new wheels and tires in the rear:
I did some more work to the car this weekend. I got the lower chassis
extension coutersunk in a few places and got the steering bellcrank
posts mocked into place. The screws need to be a little longer so that I
can space the bellcranks up to clear the lock nuts that secure the
chassis plate. I got the rear shock tower mocked up but it still needs
some “finish work” (I don’t have any pictures of that just yet).
I spoke to Traxxas last week about the suspension setup and explained
that I needed an arm that is the same length as a Bandit rear arm but
that would accept the Slash 4×4 caster and hub assembly. The tech
assured me that the Telluride arm was the same as a Bandit since he was
the one who designed the Telly. I ordered a set of Telly arms and they
arrived Saturday and guess what? They don’t fit. The Telly arms are a
significant amount longer and won’t allow the tires to tuck into the
fenders. I went back to the Bandit rear arms with some trimming done and
everything is moving freely now.
I am going to pick up some more hardware this week and hopefully next
weekend get the rear shock tower finished, the rear TC shocks mounted,
the body posts in place and the steering done. I have the material for
the servo mount (it just needs cut and mounted) but I still need
material to make the steering link. I am still on the lookout for an ESC
and driveshaft “sponsor”. I’ll be selling the extra pieces of the
Bandit that I’m not using so that will help free up some funds. If
anyone knows of a smoking deal on some driveshafts or an ESC, please let
me know.
On to the pics!
A front shot of the Bandit rear arms in their new “flipped” orientation:
The initial mockup of the steering posts:
And the comparison of the Bandit arms (on the left) to the Telluride arms (on the right)
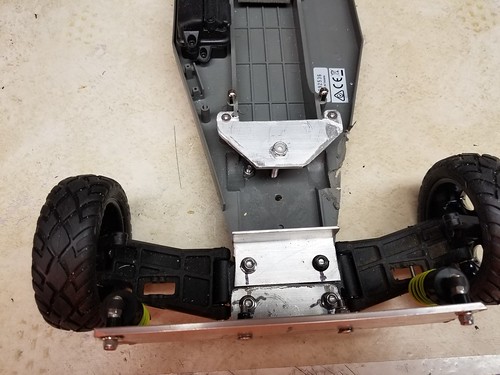
I spent a big chunk of the day today working on the car and it was a case of one step forward, ten steps back. I got the rear shock tower in place and when I mounted the shocks I realized that the tower was off by nearly 1/2″. The left side of the tower sat much farther forward than the right and the shock holes weren’t level.
I had to rethink the steering bellcrank location as it was too far toward the center of the chassis and put the steering links at an odd angle. I moved it forward almost an inch and this corrected the angle. I am using the stock holes for the lower plate to secure the lower extension plate and these are also the mounting location for the bellcrank posts but the stock holes are slightly too wide for the bellcranks to sit in their natural position so they are angled in slightly. This will take a longer drag link to correct.
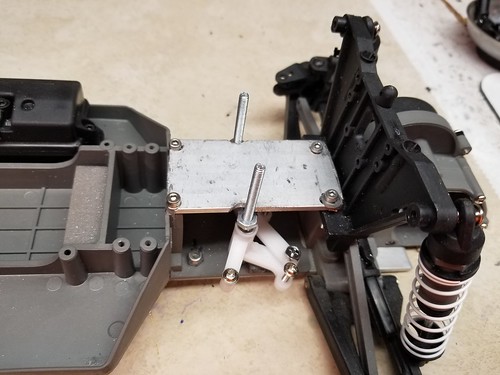
Next up I tried to make an upper chassis extension. It is a simple rectangular plate that bolts to the transmission housing and the chassis and also has two holes for the steering bellcranks to be secured to. I managed to cut the piece at an angle and none of the 6 holes line up. That piece went directly into the recycle bin. I’m going to try again tomorrow with a piece of lexan to make a template first and then transfer the pattern to the aluminum.
I managed to cut the servo mount and get three of the four servo holes drilled correctly. The fourth slipped and split the mount. I originally measured the piece to be oversized but when I cut it, I cut it wrong and it was slightly undersized. It still fits but I don’t have as many options for mounting it now that it’s so small.
Finally I spent almost an hour trying to mount the front body posts before I realized that the shock tower isn’t drilled for 3mm hardware yet. I feel like today was a waste. Everything I tried to fabricate was ruined, I just don’t have the eye for using a grinder anymore. I wish I had a 3d printer, I would just program what I need and print it out. Tomorrow is a new day and I’ll get my big mopey self into the shop and solve the problems that I created today.
On a brighter note, I found a company to cut the paint masks for the body. I had contacted several different sign shops and finally found a shop to cut them for a very reasonable price. I should have those in hand by the end of the week and hope to do some painting next weekend if the weather holds up.
Today was a lot more productive. I cleared my head last night and spent the day today working on the car with a fresh eye.
I got the servo riser plate cut, mounted, and ready to accept the servo
mount. This lined up the servo to the bellcrank while also acting as a
small chassis brace for the rear of the chassis.
Speaking of the bellcranks, I swapped out the posts for a larger set and
made a new upper chassis extension. I will be securing the posts to the
extension from the top and bottom. Unfortunately the posts are just
slightly too wide to go through the aluminum plate but they are pretty
rigid as they are.
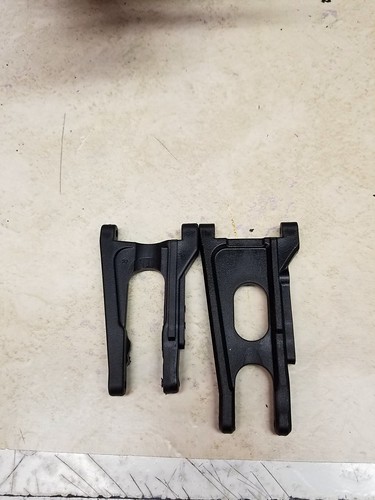
I swapped out the Bandit rear arms for the Telluride arms as I had
enough room for the extra width. This moved the tire away from the shock
and allowed for more steering throw (which I don’t really need).
Finally, I got the rear shock tower mocked into place and ready to trim.
It’s simple but it works and gives me a place to mount everything
solidly. I’ll be direct mounting the Pro-line extended body posts to the
tower without the stock shock tower mount to simplify things (by just
running screws through the posts and the shock tower).

This week I’ll be picking up the paint masks, mounting the body, and starting on the camber and steering links.
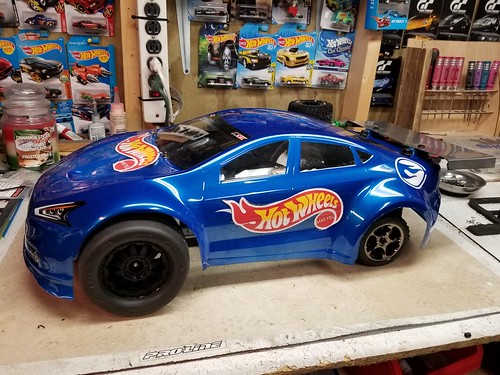
Sorry for the delay, I had a major hiccup with the paint masks and had
to make my own external decals for some of the logos. It took a little
time to get the decals to look just right but I think taking my time on
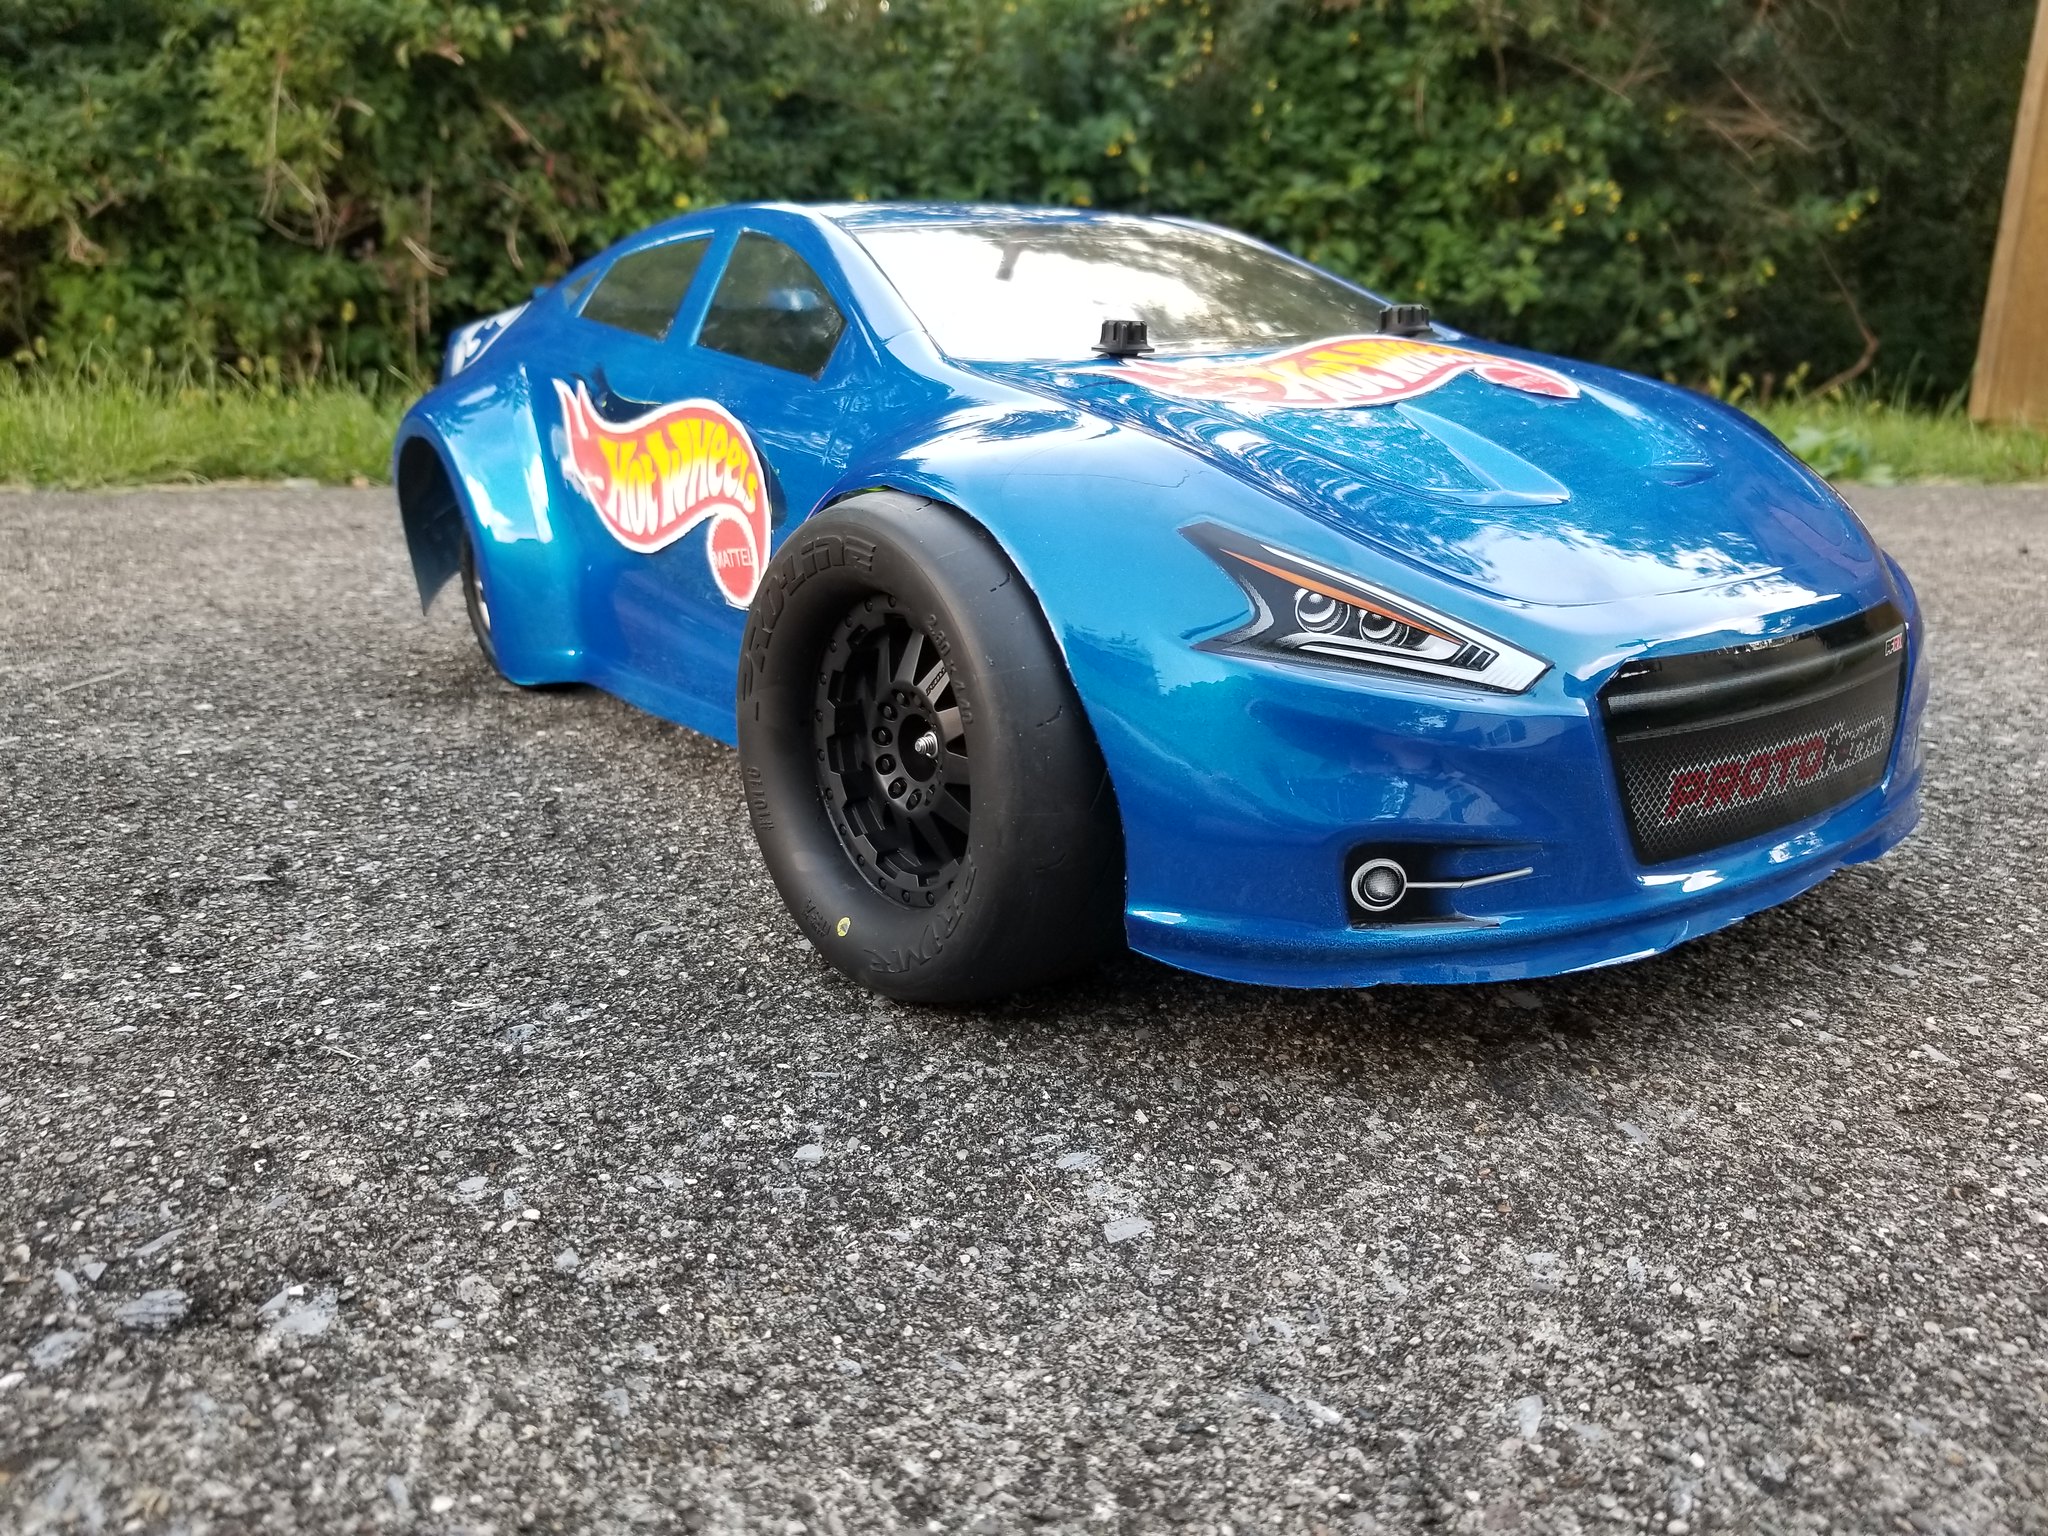
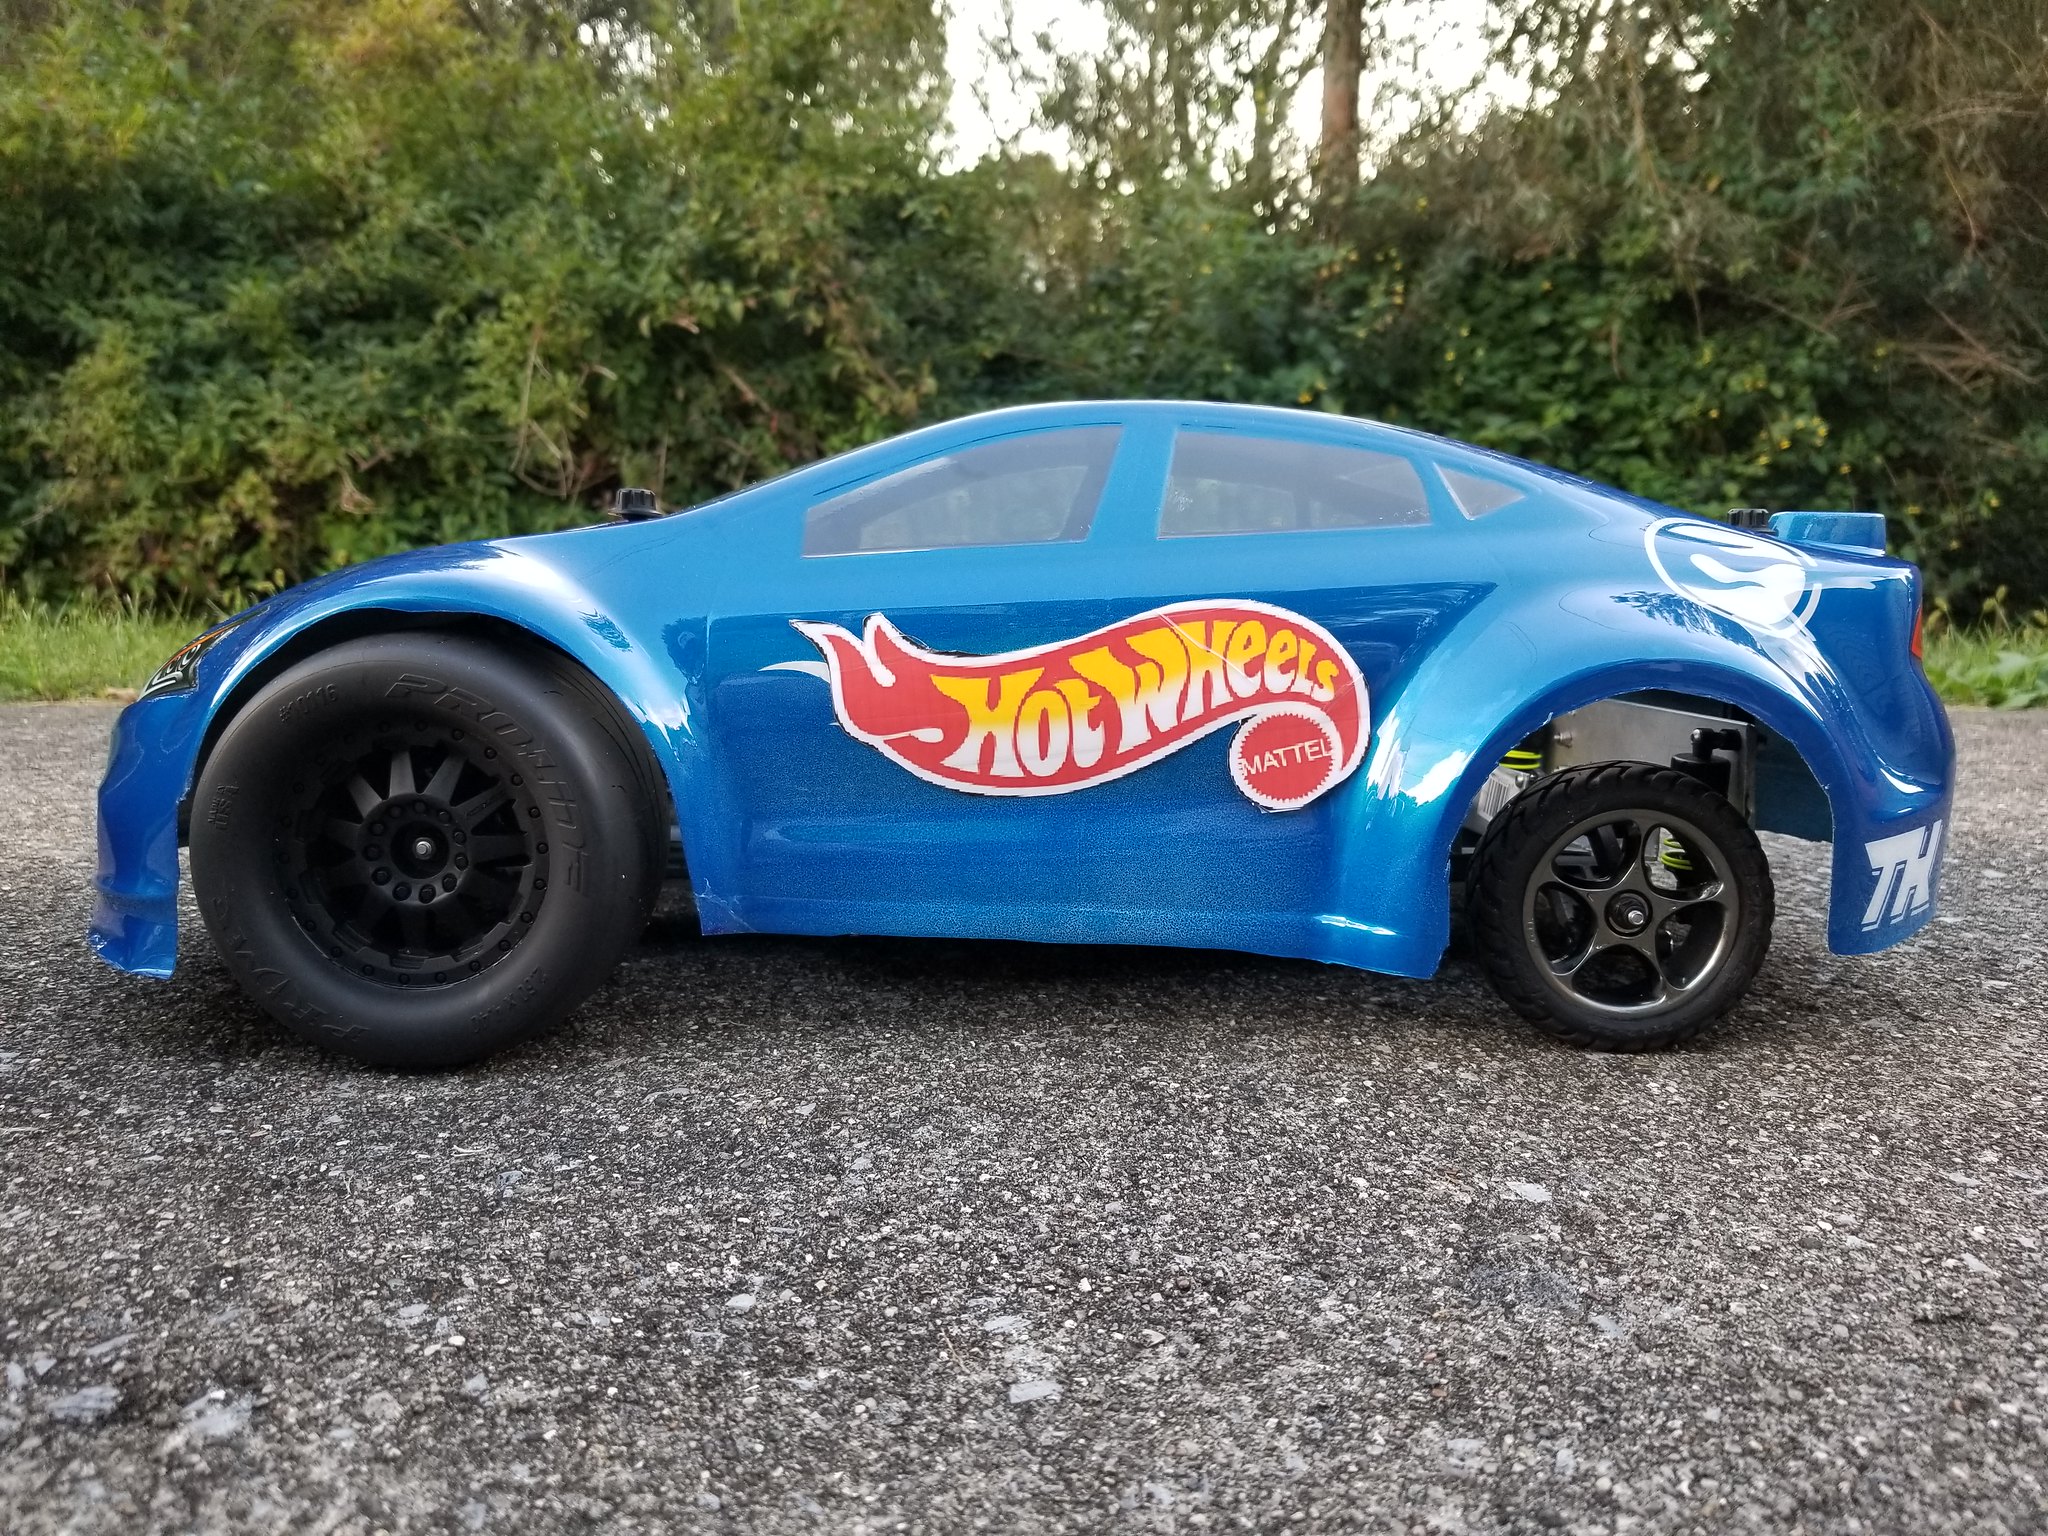
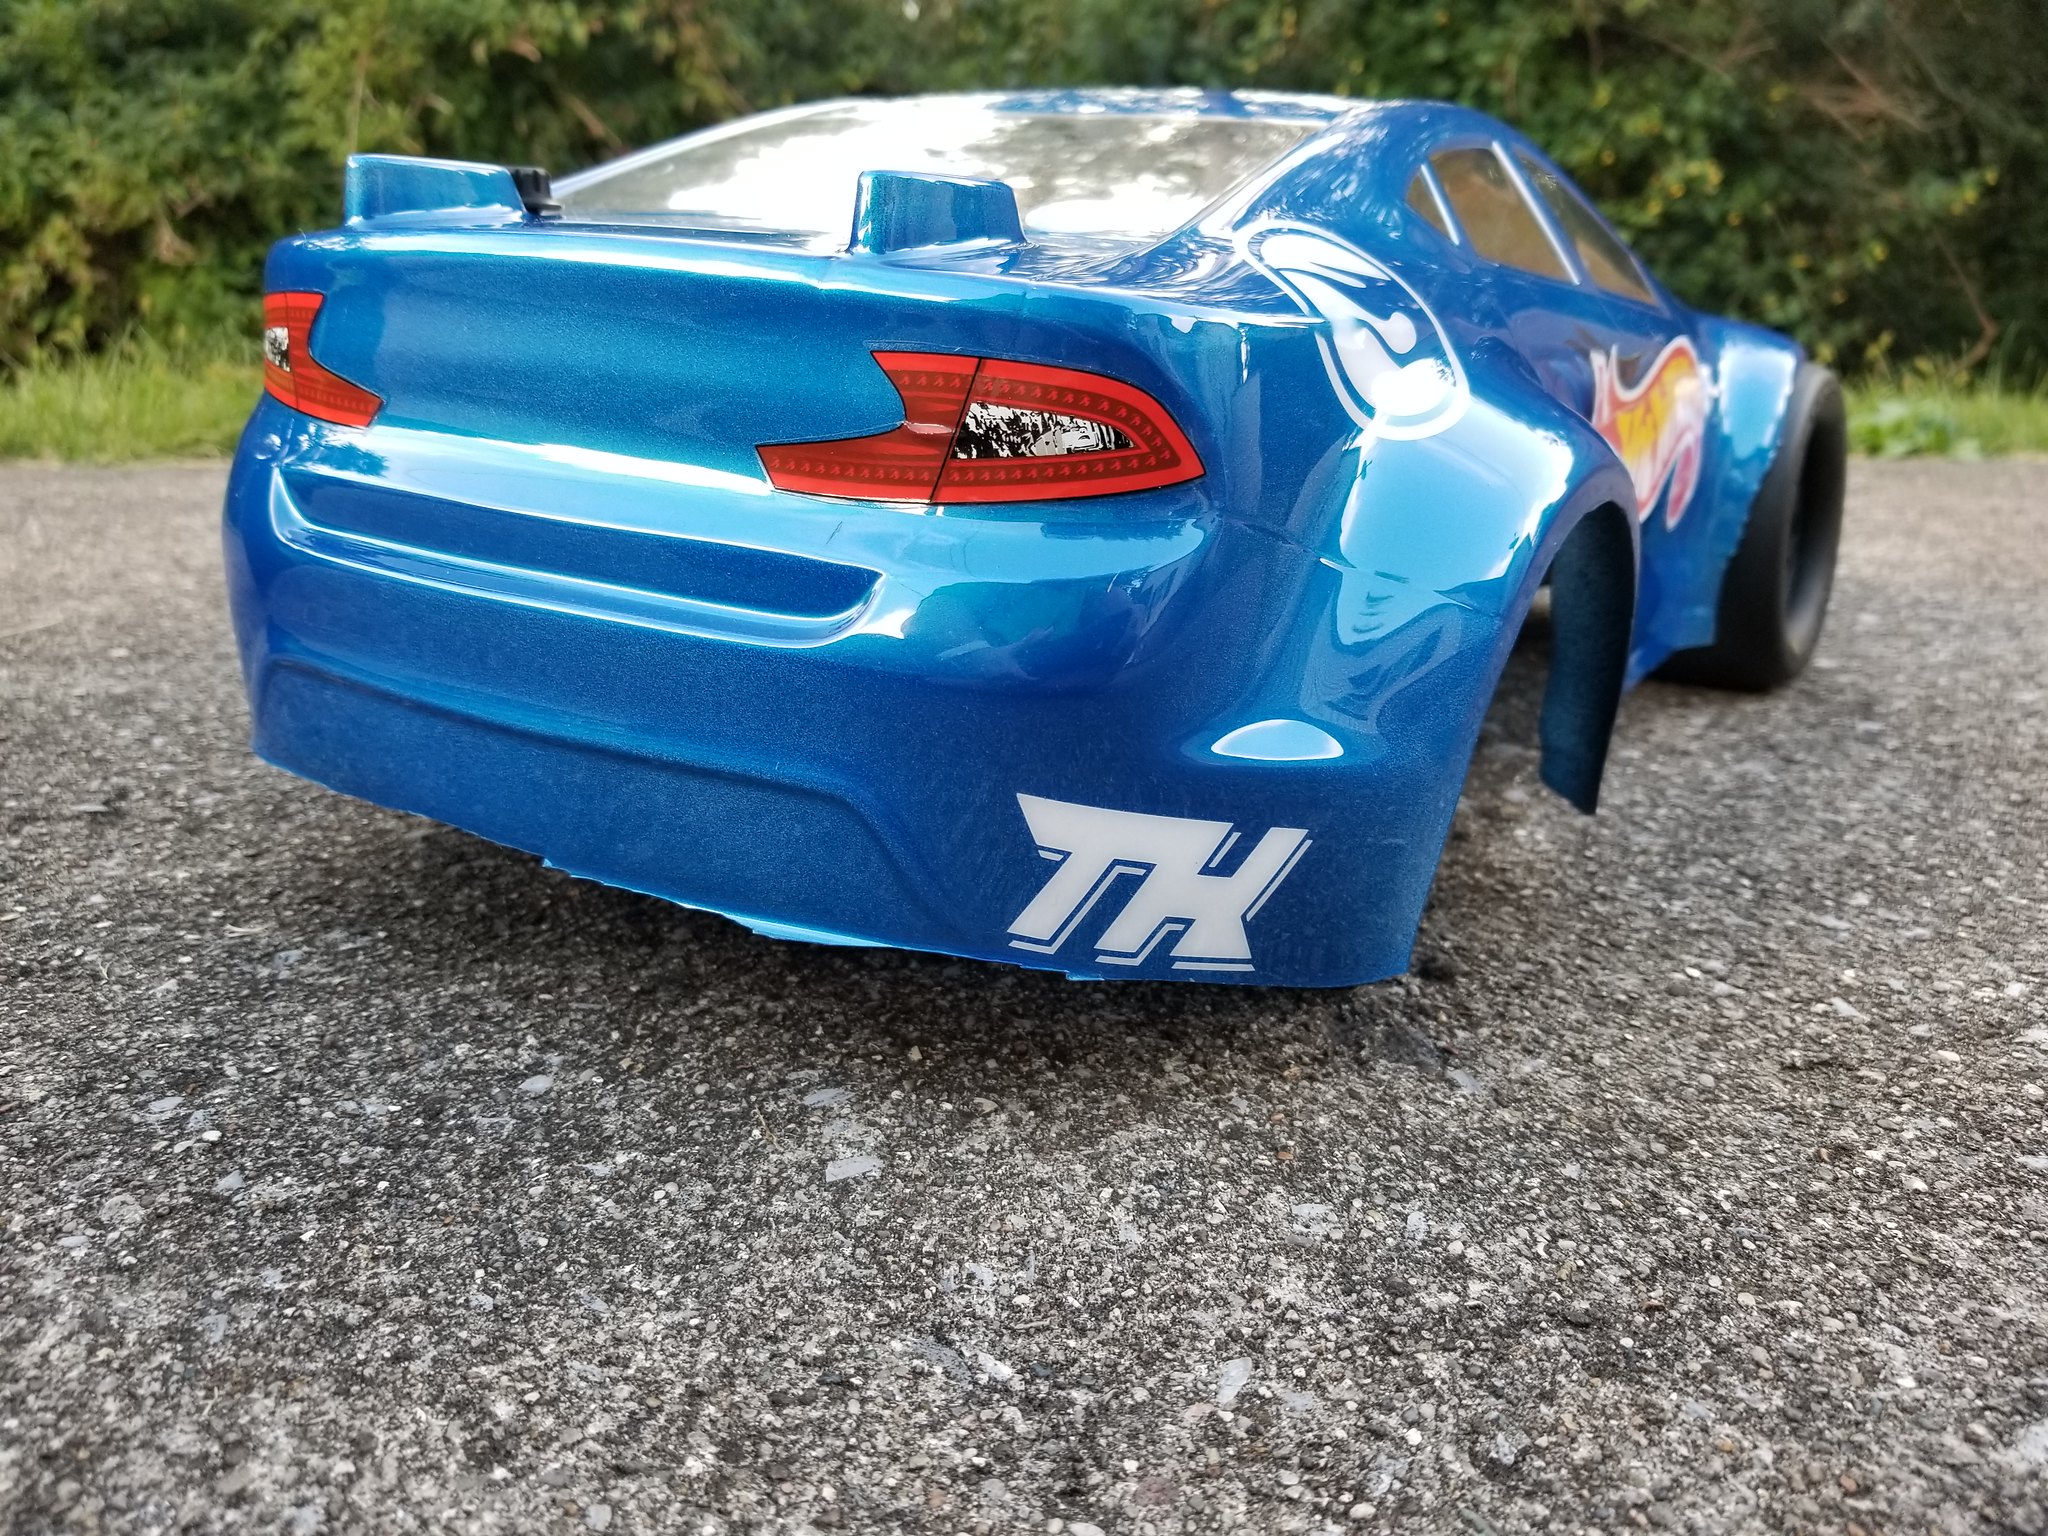
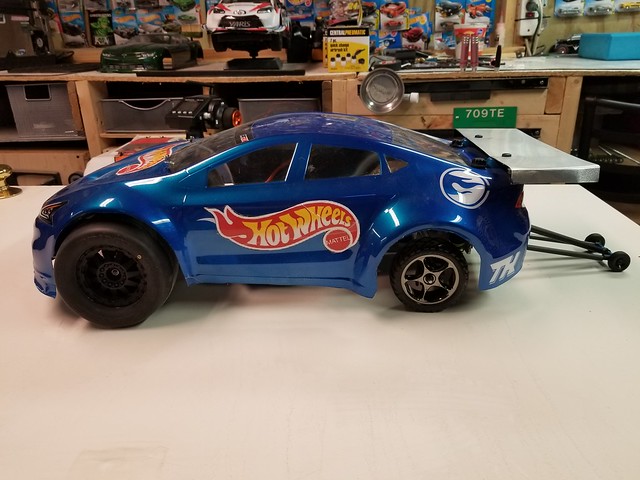
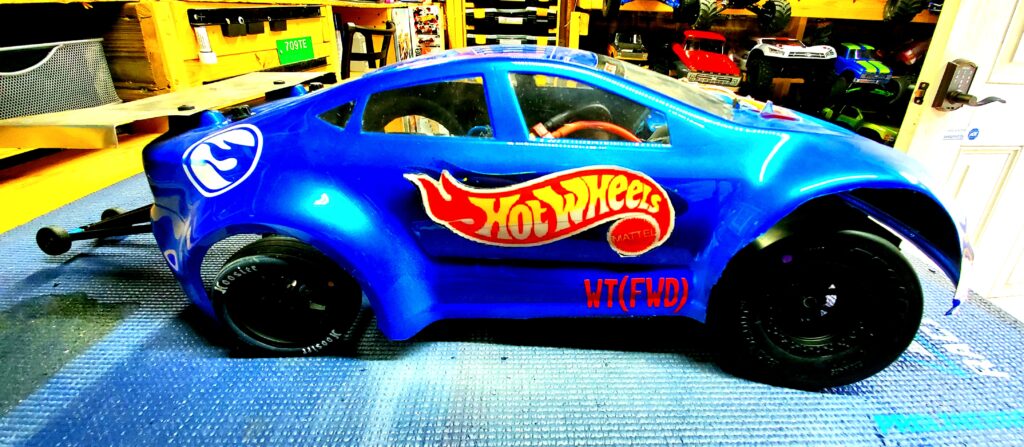
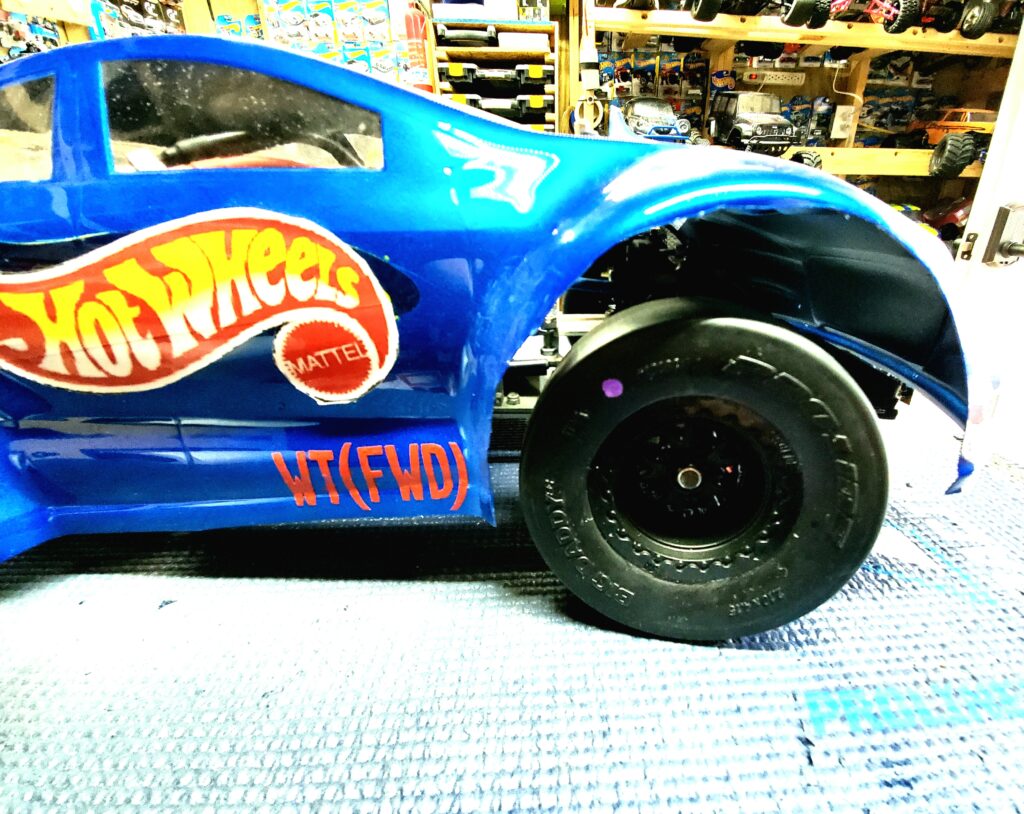
this step paid off. Introducing the worlds largest Hot Wheels Super
Treasure Hunt:


I got a little more work done on the car
today. I replaced the grub screws and caps on the Pro-line extended body
mounts with Rustler battery posts which allows me a little extra room
at the base of the windshield. I trimmed the steering bellcrank posts
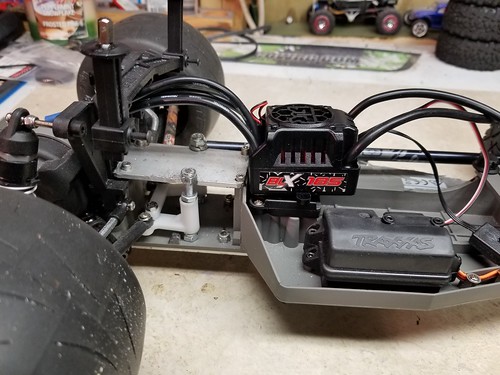
down to a reasonable height and also replaced the connectors on the ESC.
I am still looking for a motor to power this thing and am now looking
at something in the 2600-ish kV range. I made some head way on the front
bumper/ body support/ ballast mount and got the servo installed. I am
waiting on the steel driveshafts to come in and will do a little testing
with them in the Slash 4×4 before fitting them to this car. On to the
pics!
The front posts:

The bumper/body brace/ ballast mount:
The steering and overall chassis layout:
And the side profile sitting on the bench:
I got the new custom made driveshafts in yesterday and surprise surprise, they don’t work. The axle ends are not threaded for the correct locknut, the included nuts are SAE despite needing to be M4, and they are still too long. I gave the person the dimensions that I needed and the pieces that I got are nowhere near those measurements. I sent the person an email and am currently awaiting a response. If this falls through I’ll start looking into getting a used set of MIP’s to have machined locally. I never imagined that the driveshafts would be the most difficult part of the project.
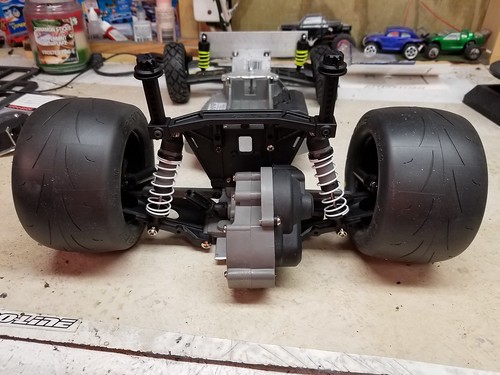
I got a set of temporary driveshafts in the car today and it looks like the transmission of a 2wd is narrow enough to allow a full length Slash 4×4 driveshaft to fit with the Telluride arms. I need to replace a few of the bearings that feel a little gritty and loose (namely the back side larger bearing in the Slash 4×4 hubs) and pick up a 3s battery as the ESC has a 3s minimum. In the future I may move to a lower KV 4s setup, but that will have to wait until the transmission is upgraded from its current stock state.
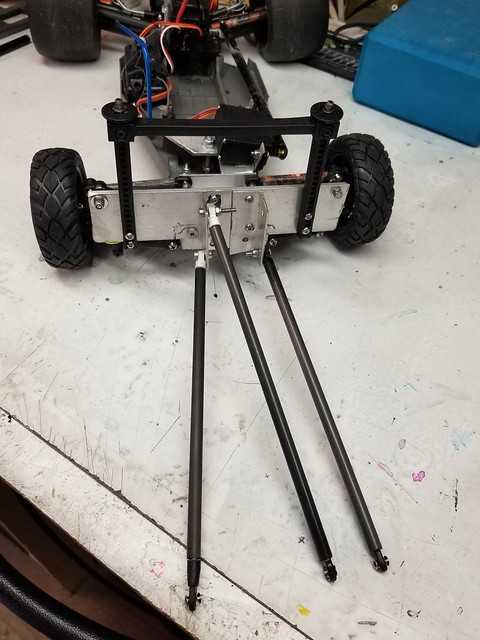
Small update on the car today. I got some work done on the wheelie bar
yesterday but ran out of rod ends before I could finish up. I picked up
another pack today so I can finish the last link this afternoon.
I took the car out to check the trims and see if it would track straight and to my surprise it was pretty close. I am running a very slight amount of toe-in in the front to help it track straight but its not enough that the front wheels are fighting each other. I replaced the set screws on the outdrives with screw pins to hold the driveshafts in place a little better; initially I was having trouble with the driveshafts slipping off the outdrives with the two setscrew retention method.
I will be doing some test hits today to see how the car launches and to start fine tuning the chassis and suspension. I hope to get some footage of the car once it actually goes A to B and will get that put up on my youtube channel once the car is presentable.
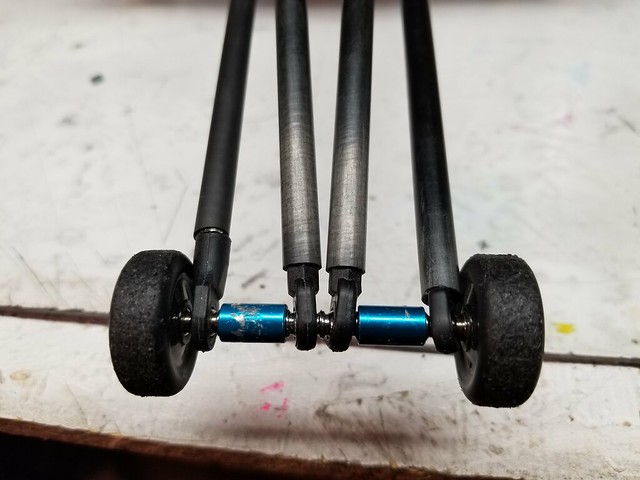
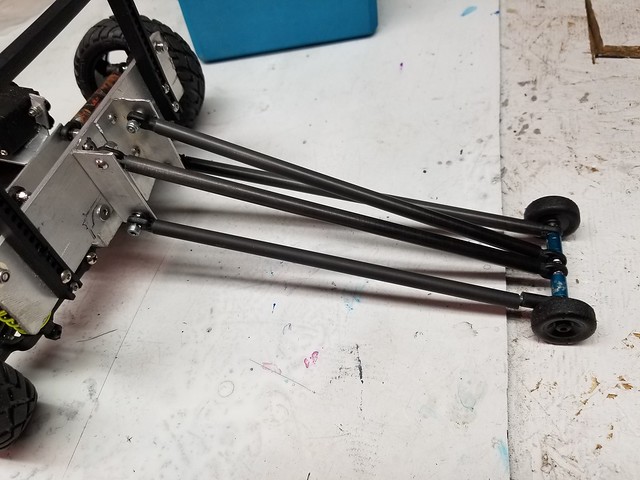
Wheelie bars are done! I currently have
the bars set so that they touch at the same time as the rear wheels.
This should prevent any weight transfer and keep the front tires
planted. They are mounted in tension from two different directions which
keeps it surprisingly stable. The two lower bars are being pulled out
while the upper bars are in tension inward so the forces counteract each
other. The wheels and wheel mounting hardware are stock Traxxas
Stampede 4×4 pieces (the plastic wheel and the long shoulder screw that
mounts it) and the blue aluminum standoffs are from an old Integy T-Maxx
bulkhead brace set (of all things).
I unfortunately didn’t get to test the car today as the skies opened up
and dumped rain all afternoon. We are expecting snow tomorrow (despite
the fact that it was 70 today) so I’m not sure when the pavement will be
dry up enough to try again.

I just took the car out with a half-charged 2s pack to see if the front would hook and on cold tires it won’t. I can spin the fronts the entire length of a 1/10 quarter mile if I don’t back off the trigger. Once the tires are warm they will hook with a soft launch but it still takes a light finger to get the car going. I will most likely loosen the slipper a little and go up a tooth or two on the pinion to soften the launch even more. Just like the Traxxas Funny Car, this car actually benefits from doing a burnout. It warms the Primes up and cleans them off and my most successful launches were after a few seconds of spinning the tires while holding the wheelie bar.
I had tossed around the idea of building an apparatus to lock the rear wheels using the third channel switch on the transmitter but the car has so little weight in the back that it will just drag the back instead of sitting still. I still have a few plans and projects coming for the car but I am really happy with how it performs so far.
Test run number two went better than last time. I dialed out a little more camber and set the wheelie bar to touch just after the rear tires start to compress. The reduction in camber helped a bit but I feel like I still have a little too much so I’ll take a little more out before the next outing. With the Telluride arms and Slash 4×4 c-hubs and knuckles the car has a fair bit of camber gain but that kind of works in its favor as when the car launches the front tires stand up and the contact patch gets a little flatter. I don’t think it is standing up enough for the amount of camber that I currently have so I’ll keep fiddling with it until I hit the sweet spot.
After a few “mild” launches I decided to send it and at that point the wheelie bar decided to separate where the set screw holds the two M3 spacers together. I completely forgot to thread-lock that piece and I think I’ll replace that set-screw with one that is longer to have more thread engagement.
Overall the car is performing on par with what I expected. I knew it would need a bunch of adjustments to work properly and there’s not really a resource to rely on to find information about a FWD Slash so I am learning as I go. Is this the easiest way to go fast? No, not really. Is it fun trying? Abso-freakin-lutely! I guarantee that no one else will show up at the strip with the same car!
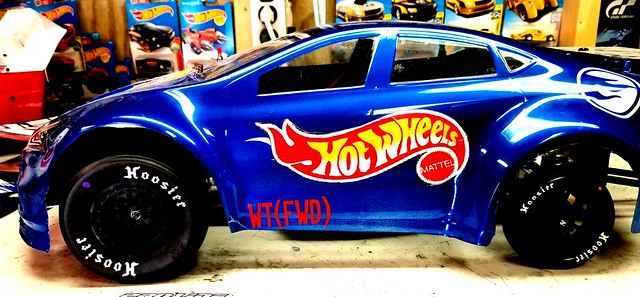
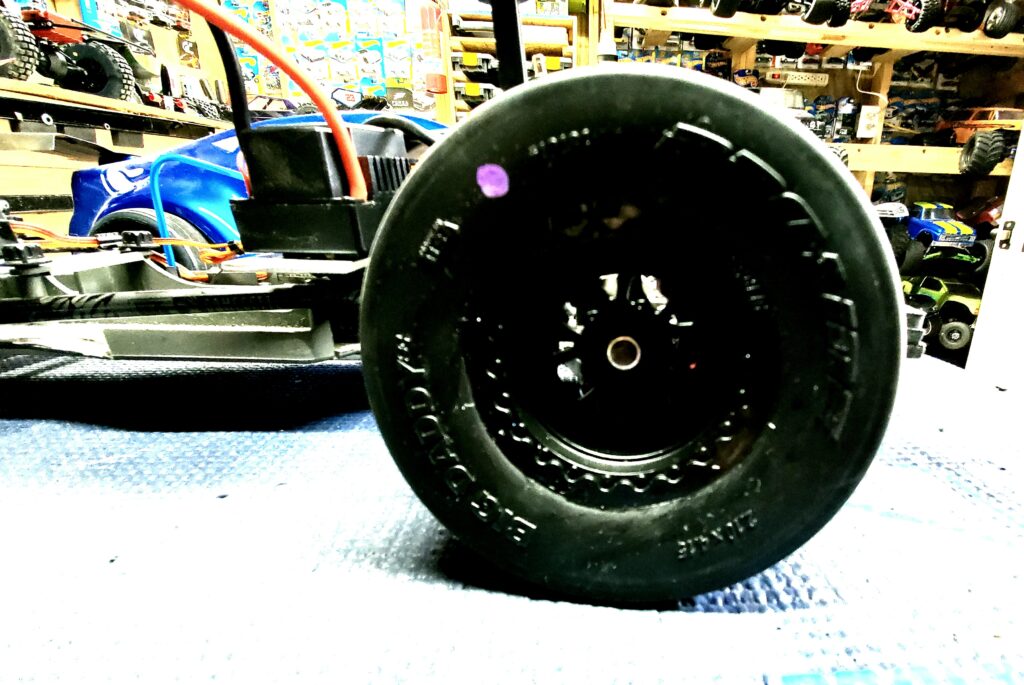
WT(FWD) got some new shoes today! I got a
couple sets of the Pro-Line Hoosier slicks (for the front) and the front
runner style 2.2’s (for the rear). The SC sized fronts are the MC
compound and the 2.2’s are S3’s. The MC compound is ridiculously sticky
and I hope that they solve the off-the-line traction issues that this
car has. The tires are mounted on PL’s new Pomona wheels, which have a
ton of detail and are much nicer than they look in pictures (which is
saying something as those wheels look really good in photos).

The MC Clay compound of the new Hoosier’s makes a night and day difference in launching the car. With the Prime’s the car spun hard from anything above 1/4 throttle but with the new tires it hooks and goes without question. I did a few test launches on my driveway which is a very textured, almost sandpaper-esque, concrete and it launched like I had always hoped it would. I haven’t had the chance to take the car out on regular pavement so that is still a mystery as to whether the Hoosier’s will help on unprepared, smooth surfaces. As a side note the tires were the easiest set I’ve ever glued. The beads slid right into their home and glued up with no issues.
Update, 25 July 2019:
I took the car to a large parking lot where I could stretch its legs. I’ve done top speed runs here before and the pavement is flat and very smooth. I measured off 132 feet and made sure the “strip” was clear of any debris before running the car. Once everything was set up I plugged in the battery and set the car on the ground. When I pulled the trigger to putt around and check the steering trim the car just sat there. The steering worked fine but the throttle was unresponsive. I tried unplugging and plugging the battery back in with no success. Dejected, we headed back to the shop. Once I got the car on the bench I swapped out the receiver as I thought that maybe channel 2 had gone out, but the problem persisted. I swapped the original receiver back in and checked all of the wiring to make sure nothing was loose. Again everything was as it should be. I checked the motor in another truck with a known good ESC and it spun perfectly fine, both in forward and reverse. Swapping the motor back over to WT(FWD) I then swapped out he ESC with the one that I had just used and it initialized and worked fine. It seems that the ESC in the car was not giving all of the startup tones that it should have been, only recognizing the battery but not the motor. I’ll keep messing around with it on the bench but I don’t think its saveable. I’ll source another ESC soon and get the car back on its feet.
I swapped in a new ESC today and got the car prepped for an outing this evening. One of my neighbors has gotten into RC recently (wonder how that happened?) and wanted to race the car. He has a Slash 2wd VXL that is box stock running a 3s Traxxas pack and the truck runs pretty well for what it is (TSM really makes this truck easy to drive). I charged up a 2s and a 3s pack to see what would be a closer race and headed out.
We have found a location that is out of the way and has really smooth pavement that makes for a perfect drag strip. After measuring off 132 ft and getting the area cleared of any large debris (just a tertiary sweep to remove any gravel, not treating the surface) we were ready to go.
I have to say, this car launches much better than I ever expected it to. I have the slipper set to lock up after about 6 feet or so which is a little looser than I usually run any of my other trucks but it allows the front tires to have a little momentum before the “hit” of torque has a chance to break them loose. The wheelie bars actually do a great job keeping weight on the front tires; the car didn’t try to unload at all during any of the passes. On 2s the car is easy to drive, just nail the throttle and point it toward the finish line.
Admittedly, on 2s, I got shown the taillights. The car is geared to hit its max RPM on 3s at the timing lights and on 2s it just doesn’t have the RPM it needs. On 3s however, watch out! The car still tracks straight from start to finish it just gets to said finish much quicker.
On 3s, the Slash couldn’t keep up. The truck has trouble keeping the front end on the ground both on the launch and once the truck gets some air moving over it, while WT(FWD) doesn’t suffer from either issue. Swapping transmitters was an eye-opener as the stock Slash took so much more finesse and skill to go straight for 132 feet. We tried loosening the slipper slightly which helped but it would still wheelie once the slipper grabbed and at best the truck could only reach full throttle within the last 1/4 of the run.
The car did pretty well this time out. The wheelie bar came apart after running two full packs back to back and I need to use some longer hardware to re-assemble it but otherwise the car is ready to go again!
UPDATE 7/13/2020
I’ve taken some time during the lockdown to make the car better and it has made some promising progress. The first upgrade on the list was a Hot Racing diff lock spool (part #TE125). This little aluminum widget was $12 well spent. Gone were the days of the car diffing out if one tire lost traction and torque-steering in that direction. The car launches straighter, is more consistent and is easier to drive throughout the pass. When launching the car there is no side to side shake or need to steer the car as it veers into the one direction or the other. The car simply works better with the spool.
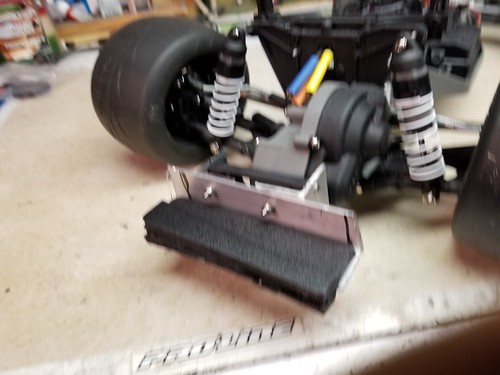
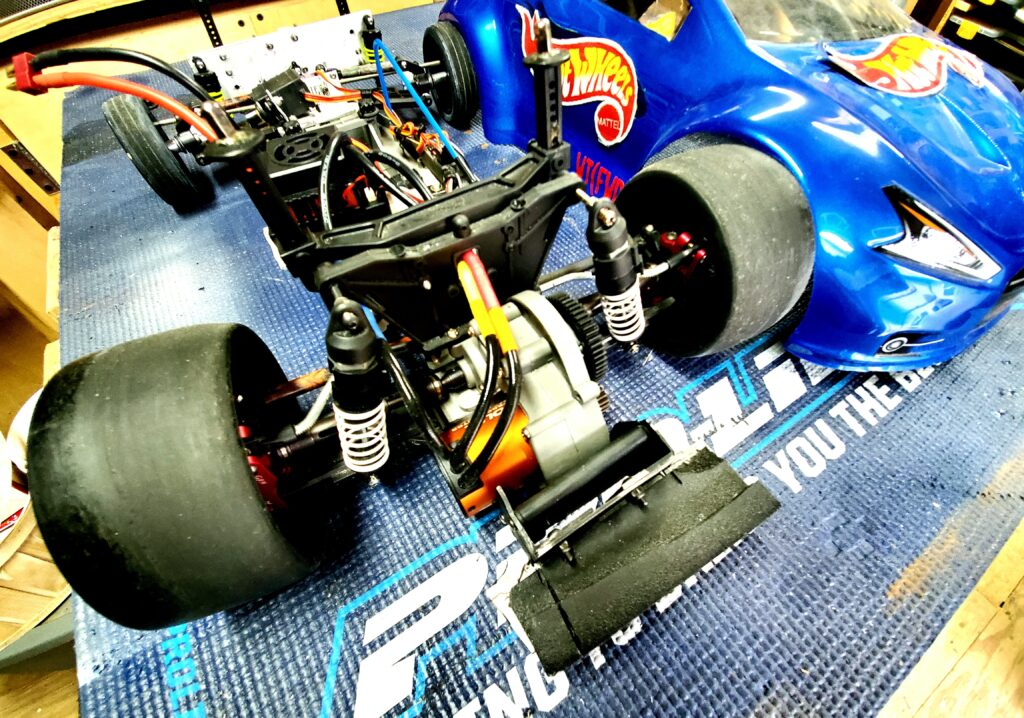
Since the beginning of the project I have wanted to create a way to do a burnout with the car without actually having to hold it back. Real cars don’t need to be held in place while doing a burnout and I didn’t want this one to either. I’ve had a few ideas kicking around my head on how to accomplish this, ranging from a disc brake attached to a diff that can lock the rear wheels to a servo actuated arm that would deploy against the ground (F1 air jack style). In the end I chose a simpler system that would provide more leverage and be more reliable. What I finally came up with was this:

I started by hard mounting a MG90s micro servo directly to the rear camber link plate using (2) M3x40 button head stainless screws. I knew I wanted the locking arms to be braced to prevent all of the force from being transferred into the servo so I built plates that could mount a rod end to. These plates are fashioned out of simple 1/8″ thick aluminum L-channel and are attached to the arms with a M3x10 button head stainless screw. That rod end acts as a guide for the 8-32 threaded rod that I used as a sturdy link between the servo and the wheel. One of the links had to be bent to work at a proper angle which was easily accomplished with my new Harbor Freight handheld tubing bender (best $7 fab tool I’ve bought to date).


Operation is fairly simple. Pull the car into the “water box” and hold the third channel switch on the radio to engage the “hand brake”. This pushes the rods into the spokes of the wheels and locks them into place. Do the “burnout” and release the 3rd channel switch to release the brake. So far I have taken it easy and not tried to drive out of a burnout as I’m not confident that the rods will release smoothly under load without binding on the wheel or putting excessive strain on the servo.
The first video of testing the e-brake:
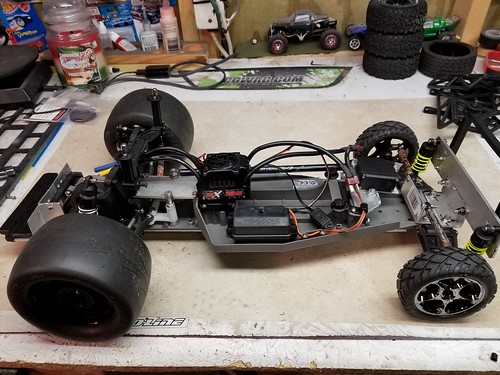
Project WT(FWD) gets featured with a closer look under the hood
UPDATE 5/4/21
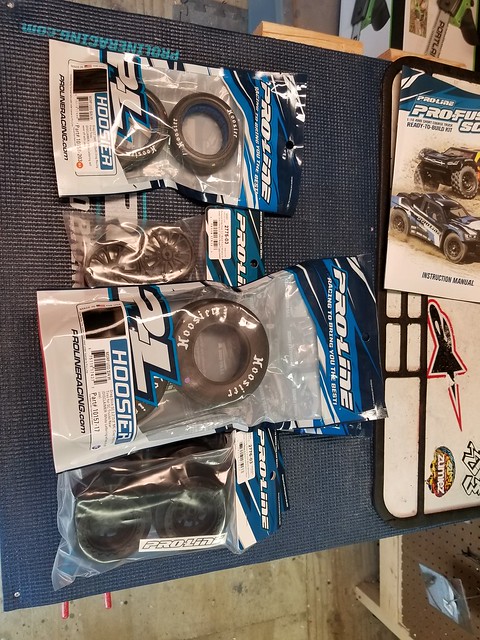
In between rain showers I took a few minutes and mounted up a new set of Pro-Line Big Daddy’s on standard width Pomona SC rear wheels to try. I was only able to get a few test launches in before the rain set in for the evening but these tires are a sizeable improvement over the Hoosier’s that were on the car; so much so that the car will no longer do a standing burnout and instead drags the rear tires for a controlled rolling burnout. Aside from that “issue” I am extremely happy with the new setup. I expect that they will grow a fair bit on the top end thanks to their ultra-soft compound and being non-belted but this car is still easy to drive when the fronts are impersonating pizza cutters. Once the rain lets up and I can get out to do some proper full-track passes I will report back.

Some video updates on the project:
UPDATE July 13, 2021
A few more test hits under its belt:
I’ll be replacing the servo this week with a JX unit (7kg, .07s to 60 degrees) and will also be shelving the 3800kV 550 for a 5200kv 540 4-pole in the near future. The 3800 doesn’t have the legs from half-track on and the torque is too much for the chassis. With any luck the 5200 will solve both issues and get the car to be a little more competitive with the RWD cars.